
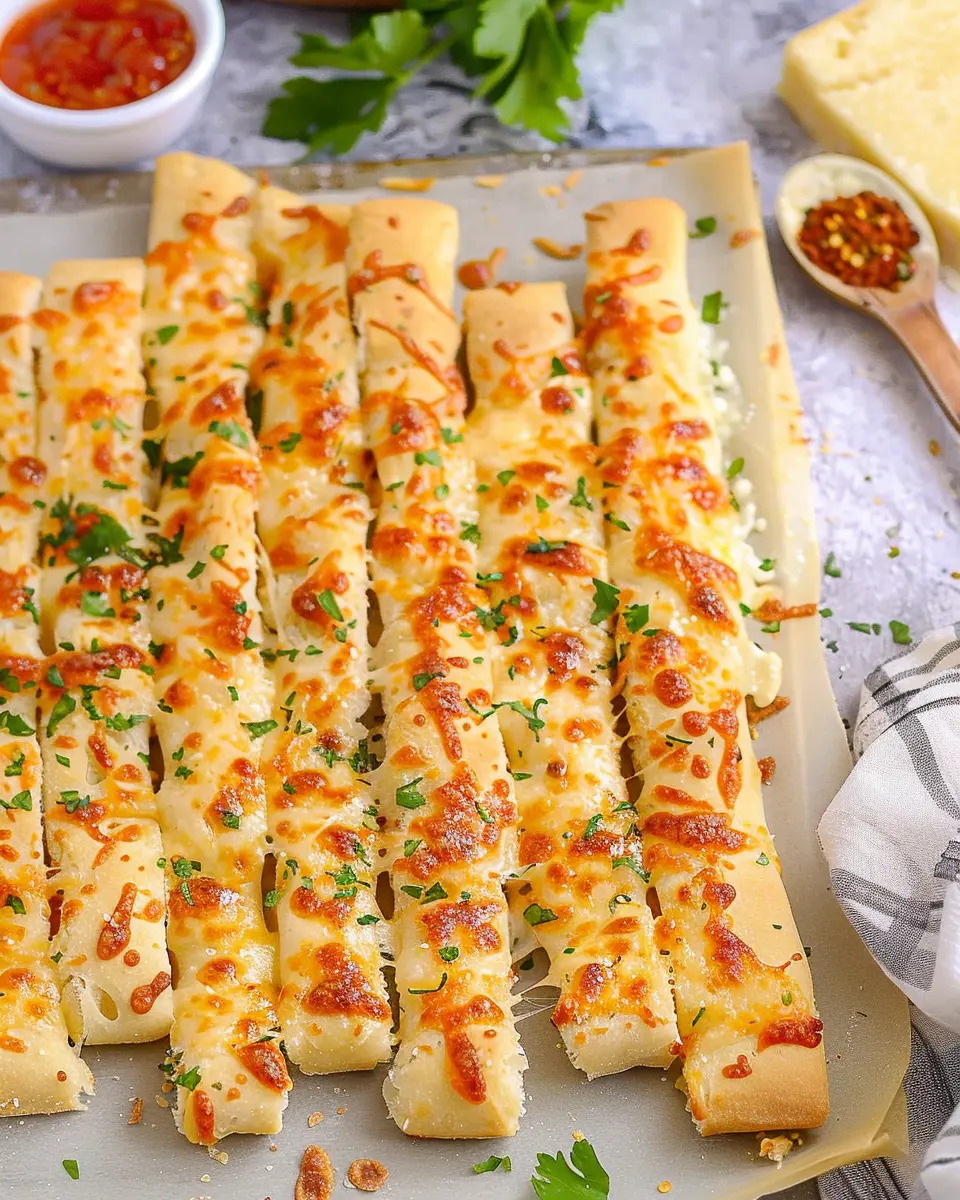
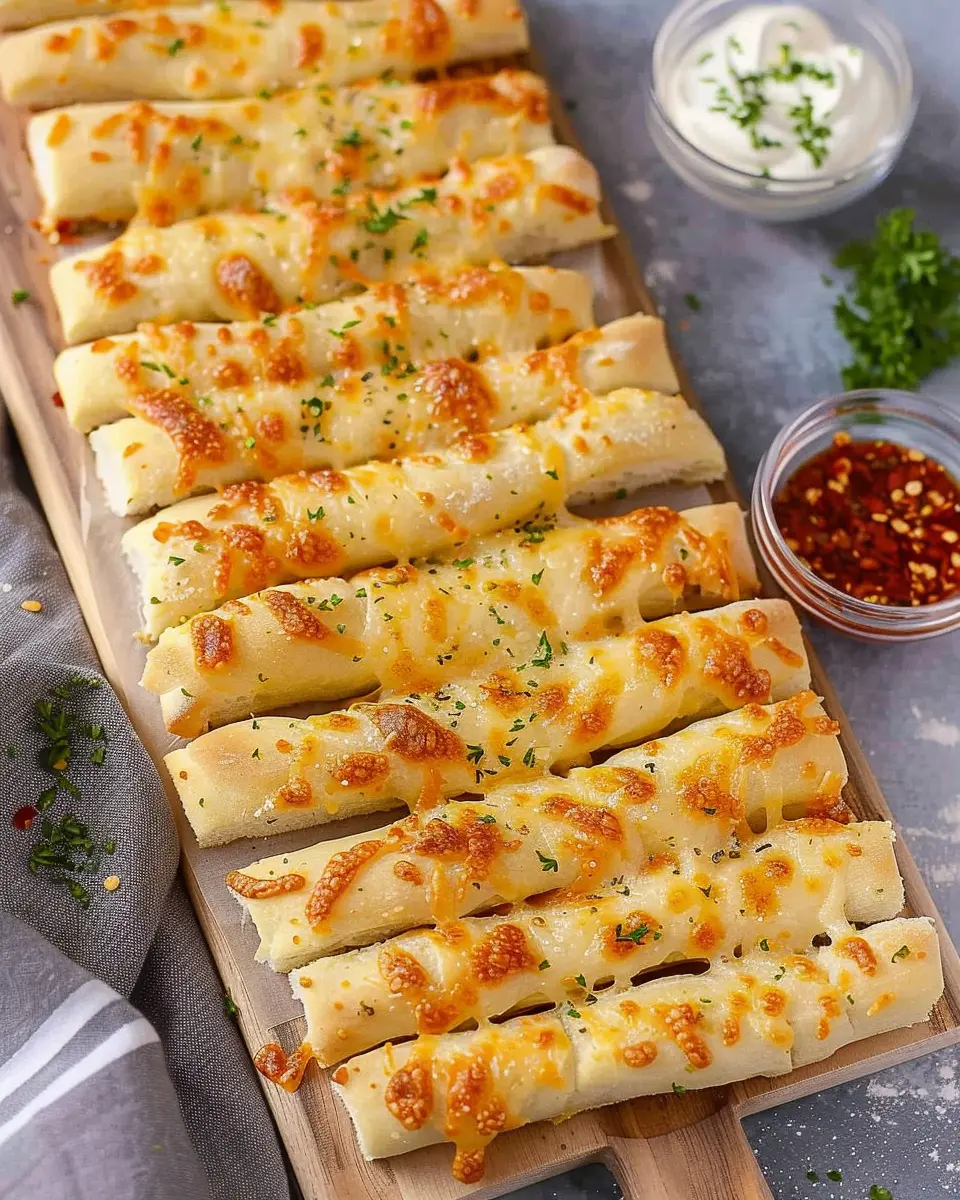
Introduction to Homemade Cheesy Breadsticks
When midweek cravings hit, and you find yourself staring into the fridge, wouldn’t it be amazing to whip up homemade cheesy breadsticks in no time? These delightful snacks are a lifesaver for young professionals juggling work, social lives, and the quest for quick yet satisfying dinners. Imagine having gooey, cheesy goodness right out of your oven, ready to be devoured while catching up on your favorite series or casually enjoying a game night with friends.
Why Homemade Cheesy Breadsticks Are a Game-Changer for Young Professionals
Homemade cheesy breadsticks strike the perfect balance between taste and convenience. In today’s fast-paced world where meal prep can feel daunting, these treats allow you to indulge without sacrificing your valuable time. Here are a few reasons why they deserve a place in your kitchen:
-
Quick and Easy: With minimal ingredients and only a short baking time, you can have fresh breadsticks ready in under 30 minutes. Ideal for those busy weeknight dinners or as an appetizer for a small gathering.
-
Budget-Friendly: Preparing them at home is not only healthier but also cheaper than ordering takeout or buying pre-made snacks. Save those hard-earned coins while still satisfying your cravings.
-
Customization Galore: Want to add a twist? Toss in some herbs, select your favorite cheeses, or load them up with toppings like Turkey Bacon or Chicken Ham. The options are endless, and you can cater to your taste preferences or dietary needs.
-
Impressive Yet Simple: Hosting friends? Homemade cheesy breadsticks are easy enough to prepare, yet they look and taste gourmet. Your friends will be impressed, and you’ll relish those compliments while knowing you did it without breaking a sweat.
If you’re eager to showcase your culinary skills without the hassle, check out these tips on baking. Let’s dive into the recipe that will have you and your guests raving about your homemade cheesy breadsticks!

Ingredients for Homemade Cheesy Breadsticks
Creating homemade cheesy breadsticks is a delightful way to elevate your snacking or dining experience. Here are the essential ingredients you’ll need for this cheesy, savory treat.
Key Ingredients You’ll Need
- Shop-Ready Pizza Dough: For ease, a store-bought option works wonders. Alternatively, make your own for that homemade touch.
- Shredded Cheese: Mozzarella is a classic, but mixing in some cheddar or parmesan can add an extra layer of flavor.
- Garlic Powder: This ingredient infuses the breadsticks with a lovely aroma and taste.
- Olive Oil: Brushing a bit on top not only helps achieve a golden crust but enhances flavor.
- Italian Seasoning: A dash of this blend can take your breadsticks to the next level.
Quality Matters: Choosing the Right Cheese
When it comes to your homemade cheesy breadsticks, don’t compromise on cheese quality. Opt for fresh mozzarella that can melt beautifully, creating that gooey texture we all love. For an extra flavor punch, consider using aged parmesan or a mix of different cheeses. Did you know that fresh cheese can elevate your dish’s overall taste? It’s worth the effort!
Looking for more cheesy inspiration? Check out this guide on cheese types and learn how each can transform your recipes! Enjoy making your cheesy breadsticks—they’re perfect for game night or as a cozy side dish!
Preparing Homemade Cheesy Breadsticks
Have you ever had those moments when you’re craving something cheesy and delicious? Well, homemade cheesy breadsticks can fulfill that desire perfectly! They make a fantastic side for pizza night or even a snack on their own. Let’s dive into how to prepare these delightful treats step by step.
Gather Your Ingredients and Equipment
Before you start, it’s essential to have everything ready. Here’s what you’ll need:
-
For the Pizza Crust:
-
2 ¼ tsp active dry yeast
-
1 ½ cups warm water (about 110°F)
-
3 ½ to 4 cups all-purpose flour
-
2 tbsp olive oil
-
1 tsp sugar
-
1 tsp salt
-
For Topping:
-
½ cup unsalted butter (melted)
-
3-4 cloves garlic (minced)
-
1 tsp dried oregano
-
1 tsp dried parsley
-
1 ½ cups mozzarella cheese (shredded)
-
½ cup Parmesan cheese (grated)
-
Equipment:
-
Mixing bowls
-
Baking sheet
-
Rolling pin
-
Parchment paper
Now that you’re set up with your ingredients and tools, let’s get to the fun part!
Create Your Homemade Pizza Crust
Making a homemade pizza crust is easier than you think! Start by activating your yeast. In a mixing bowl, combine warm water, sugar, and yeast. Let it sit for about 5-10 minutes until it’s frothy.
While waiting, you can think about personalizing your breadsticks. Maybe you prefer adding a bit of spice or even some herbs. Get creative! Once your yeast is ready, add oil, salt, and flour. Mix it until the dough begins to form.
Knead the dough on a floured surface for about 5-7 minutes until it becomes smooth and elastic. This step is crucial as it helps develop the gluten – the magic that gives your crust its chewy texture.
Roll Out and Shape the Dough
After letting your dough rest for about an hour (covered with a damp cloth) so it can rise, it’s time to roll it out. Place the dough on a floured surface and use a rolling pin to stretch it into a rectangle. The thickness should be about half an inch.
Shape it on a baking sheet lined with parchment paper, making sure it fits snugly without any holes. This will form the perfect base for your homemade cheesy breadsticks.
Elevate with Garlic Butter and Herb Seasoning
Now, for the best part! In a small bowl, mix your melted butter, minced garlic, oregano, and parsley. Brush this heavenly mixture all over your dough. Not only does this add flavor but also gives your breadsticks that gorgeous golden color when baked.
Feel free to sprinkle some additional herbs if you like. Maybe basil or even some chili flakes for a little kick?
Top with Mozzarella and Parmesan Cheese
It’s time to load on the cheese! Sprinkle a generous amount of shredded mozzarella over the prepared dough, followed by a dusting of grated Parmesan. Don’t be shy here – after all, it’s cheesy breadsticks we’re aiming for!
Bake to Gooey Perfection
Preheat your oven to 450°F (230°C). Once it’s hot, pop your baking sheet in and let it bake for 12-15 minutes or until the cheese is melted and bubbling, and the edges are golden brown. The tantalizing aroma will soon fill your kitchen!
When they are done, take them out and let them cool for just a moment before slicing them into strips. Trust me; the anticipation will be worth it when you take that first gooey bite.
Conclusion
And there you have it! Your very own homemade cheesy breadsticks, ready to enjoy. These will quickly become a favorite for gatherings or just a cozy night in. Don’t forget to pair them with your favorite dipping sauce, like marinara or ranch, for that extra flavor boost. Happy baking!
Variations on Homemade Cheesy Breadsticks
Cheesy herb breadsticks with different seasonings
When it comes to homemade cheesy breadsticks, the possibilities are endless! Elevate your cheesy treat by experimenting with different herb blends.
- Garlic and Italian Seasoning: A classic combo that pairs perfectly with mozzarella. Try adding minced garlic or garlic powder alongside Italian seasoning for a delightful aroma and flavor.
- Spanish Paprika: For a smoky twist, sprinkle some smoked paprika on top before baking. This adds depth and a subtle heat.
- Parmesan and Rosemary: Mix grated Parmesan cheese with chopped fresh rosemary for an earthy flavor kick. It complements the cheese beautifully.
Feel free to get creative and mix different herbs. A simple internet search can give you plenty of inspiration on popular herb pairings!
Adding toppings: From meat lovers to veggie delight
Taking your homemade cheesy breadsticks to the next level is all about toppings! Whether you are a meat lover or a veggie enthusiast, there’s a topping for you.
- Meat Lovers Delight: Add sliced turkey bacon and chicken ham for a savory explosion. Want extra protein? Consider crumbled beef pepperoni or even diced grilled chicken.
- Veggie Delight: Load up your breadsticks with fresh vegetables! Think bell peppers, red onions, or olives. These not only add flavor but also a lovely color contrast.
You could even create a mix-and-match platter, serving up different varieties at your next gathering! That way, each guest can customize their own cheesy breadsticks.
Honestly, who can resist a plate of warm, cheesy goodness adorned with their favorite toppings? It’s an invitation to indulge and share a flavorful experience that connects friends and family over a simple yet satisfying treat. Want to dive deeper into these ideas? Check out resources like Serious Eats for more inspiration!
Cooking tips and notes for Homemade Cheesy Breadsticks
Getting that perfect golden crust
To achieve that perfect golden crust for your homemade cheesy breadsticks, you’ll want to focus on a few key elements. First, keep an eye on your oven temperature—too hot and they might burn; too cool and they won’t get that delightful crunch. A preheated oven at 425°F is your best friend.
Using a pizza stone or baking sheet also helps to create an even, crispy surface. For an extra touch, brush the tops with a little melted butter or olive oil before baking. This not only enhances color but also contributes to a rich flavor!
Storage tips: Keeping them fresh
After whipping up these tasty homemade cheesy breadsticks, you’ll want to enjoy them at their best. To keep them fresh, store any leftovers in an airtight container at room temperature for up to two days. If you plan to keep them longer, consider wrapping them tightly in plastic wrap and freezing them. They can last up to a month in the freezer!
When you’re ready to devour them again, just pop them in the oven for a few minutes at 350°F—just enough to reheat and restore that beautiful crust!
For more tips on bread storage, check out this expert guide for best practices.
Now, gather your ingredients and get ready to impress your friends with these delightful sticks!
Serving Suggestions for Homemade Cheesy Breadsticks
Pairing with Homemade Marinara Sauce
Looking to elevate your homemade cheesy breadsticks experience? Serve them alongside a rich and flavorful homemade marinara sauce. Preparing your own sauce is easier than you might think, and it allows you to control the seasoning to match your taste. Simply combine crushed tomatoes, garlic, basil, and a splash of olive oil in a pot, simmer for about twenty minutes, and voila! Not only do these warm, cheesy sticks soak up the sauce beautifully, but you’ll also enjoy the added freshness that a homemade dip provides.
Great Companions: Salads and Soups
Your homemade cheesy breadsticks don’t just have to stand alone on the plate. Consider pairing them with a vibrant garden salad for a well-rounded meal. The crunchy veggies and tangy dressing perfectly contrast the gooey cheese. If soup is more your style, opt for a classic like tomato or a hearty minestrone, which complements the breadsticks beautifully. Include a side of turkey bacon crumbles on your salad for a protein-packed twist that adds even more flavor.
These suggestions not only enhance your meal but also allow for some flexible dining experiences. Who knows? You might even discover your new favorite combo!
For more ideas, check out this guide to salads or find a delightful soup recipe here.
Time breakdown for Homemade Cheesy Breadsticks
Preparation time
Making homemade cheesy breadsticks is easier than you might think. You’ll need about 15 minutes to gather your ingredients, mix your dough, and get everything ready for baking. It’s the perfect time to sip on your favorite drink or catch up on a podcast while you work!
Baking time
Once your dough is prepared, toss those cheesy breadsticks into the oven for about 20–25 minutes. This is where the magic happens—your kitchen will fill with the delightful aroma of melted cheese and warm bread.
Total time
In total, you’re looking at around 40 minutes from start to finish. That’s a small investment of time for a delicious snack or appetizer that can impress anyone! Plus, with a recipe this quick, you can whip up homemade cheesy breadsticks anytime the craving strikes. Want to learn more about perfecting your breadsticks? Check out this baking guide for expert tips!
Nutritional facts for Homemade Cheesy Breadsticks
When it comes to savoring homemade cheesy breadsticks, understanding their nutritional benefits can enhance your dining experience. Here’s a quick breakdown:
Calories
Each cheesy breadstick packs about 150 calories, making it a delightful side or snack without overwhelming your calorie count.
Protein
With a great combination of cheese and dough, these breadsticks deliver around 6 grams of protein per serving. That’s a tasty way to support muscle health and keep you fuller longer!
Sodium
Keep an eye on salt levels, as each serving contains approximately 400 mg of sodium. To lower the sodium content, consider reducing added salt or opting for lower-sodium cheese.
Whether you’re serving them alongside a warm marinara or as a quick snack, homemade cheesy breadsticks are both delicious and satisfying. For more details on healthy ingredients, check out the USDA’s guidelines on food choices. Enjoy!
FAQs about Homemade Cheesy Breadsticks
Can I make these breadsticks ahead of time?
Absolutely! You can easily prepare your homemade cheesy breadsticks in advance. Make the dough and shape the breadsticks, then store them in the refrigerator for up to 24 hours. Just remember to cover them well to prevent drying out. If you want even more convenience, you can freeze them. Simply shape and freeze the breadsticks on a baking sheet and transfer to a zip-top bag once frozen. When you’re ready to enjoy, bake straight from the freezer—just add a few extra minutes to the baking time.
What can I use instead of mozzarella?
If you’re looking to switch things up, there are plenty of alternatives to mozzarella for your homemade cheesy breadsticks. Some great options include:
- Cheddar: Adds a sharp flavor and melts beautifully.
- Monterey Jack: A mild and creamy option that works well.
- Provolone: Adds a smoky, rich flavor profile.
- Vegan cheese: Perfect for dairy-free or lactose-intolerant friends.
Feel free to mix and match these cheeses to find your perfect combination. Curious about more cheese options? Check out this cheese guide for a deep dive!
How do I make these breadsticks gluten-free?
Making your homemade cheesy breadsticks gluten-free is easier than you might think! Use a high-quality gluten-free flour blend that includes xanthan gum to mimic the texture of traditional dough. You may also opt for alternative flours like almond or oat flour, though they will change the flavor and texture slightly. There are fantastic gluten-free breadstick recipes available online that can guide you, such as this helpful resource from Gluten-Free Goddess.
With these tips, you’re well on your way to enjoying delicious cheesy breadsticks, tailored to your needs!
Conclusion on Homemade Cheesy Breadsticks
When it comes to enhancing your homemade meals, homemade cheesy breadsticks are an absolute game-changer. Not only are they incredibly easy to prepare, but they also offer the perfect balance of cheesy goodness and delightful texture that can elevate any dish. Whether paired with a hearty soup or enjoyed as a tasty snack, these breadsticks are sure to impress your friends and family.
Plus, they can be customized with various toppings or ingredients like turkey bacon or chicken ham, allowing you to get creative in the kitchen. So, the next time you’re looking to impress at dinner, give these cheesy delights a try—your taste buds will thank you! For more inspirations, check out resources like Serious Eats and Bon Appétit for endless culinary ideas.
PrintHomemade Cheesy Breadsticks: Easy and Indulgent Family Treat

These homemade cheesy breadsticks are the perfect treat for family gatherings and movie nights. They’re easy to make and loaded with cheese!
- Prep Time: 10 minutes
- Cook Time: 20 minutes
- Total Time: 30 minutes
- Yield: 8 breadsticks 1x
- Category: Appetizer
- Method: Baking
- Cuisine: Italian
- Diet: Vegetarian
Ingredients
- 2 cups all-purpose flour
- 1 teaspoon salt
- 1 tablespoon sugar
- 1 packet active dry yeast
- 1 cup warm water
- 2 tablespoons olive oil
- 1 cup shredded mozzarella cheese
- 1/2 cup grated Parmesan cheese
- 1 teaspoon garlic powder
Instructions
- In a large bowl, combine warm water, sugar, and yeast. Let it sit for 5 minutes until foamy.
- Add flour, salt, and olive oil to the yeast mixture. Mix until a dough forms.
- Knead the dough for about 5 minutes until smooth.
- Let the dough rise in a warm place for 1 hour or until doubled in size.
- Preheat the oven to 425°F (220°C).
- Roll out the dough on a floured surface, then place it on a baking sheet.
- Sprinkle mozzarella and Parmesan cheeses over the dough.
- Bake for 15-20 minutes or until the cheese is bubbly and golden.
- Sprinkle garlic powder on top before serving.
Notes
- For a spicier version, add red pepper flakes to the cheese topping.
- Serve with marinara sauce for dipping.
Nutrition
- Serving Size: 1 breadstick
- Calories: 150
- Sugar: 1g
- Sodium: 250mg
- Fat: 6g
- Saturated Fat: 2g
- Unsaturated Fat: 3g
- Trans Fat: 0g
- Carbohydrates: 18g
- Fiber: 1g
- Protein: 6g
- Cholesterol: 10mg
Keywords: Homemade Cheesy Breadsticks